There’s something so wonderfully cozy about fall, isn’t there? The crisp air, the changing leaves, and of course, all things pumpkin! Instead of just enjoying pumpkin spice lattes, why not lean into the season with a fun, handmade touch? This easy crochet Pumpkin Beanie pattern is the perfect way to do just that. It’s a simple, beginner-friendly project that whips up quickly, making it ideal for those who want to add a festive flair to their wardrobe or create thoughtful gifts.
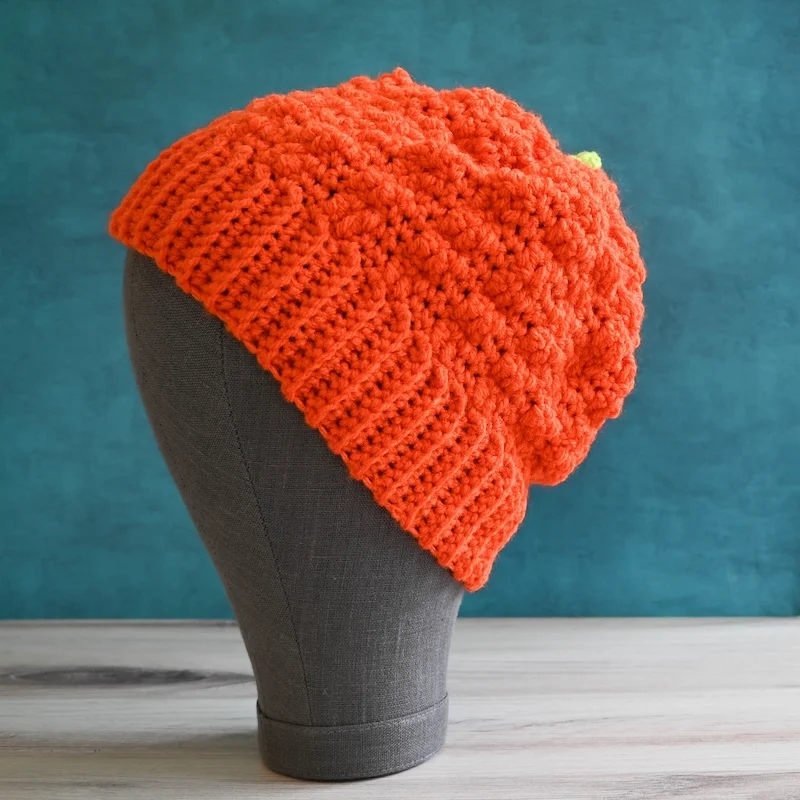
I absolutely adore how customizable this beanie is. You can play with different shades of orange or even white for a ghost pumpkin look, and then choose a contrasting brown or green for the stem. What truly makes this pattern special is that it comes in 10 sizes, from newborn all the way up to adult large. Imagine the adorable matching sets for family photos, Halloween costumes, or just cozy everyday wear throughout the autumn season! It’s worked from the bottom up, starting with a comfortable hat band and finishing with a cute little stem at the crown.
Pumpkin Beanie Crochet Pattern
Materials
- Big Twist Value yarn (100% acrylic, 6 oz/170 g/380 yd/347 m) – 1 skein each in Orange (CA) and Slime (CB), or approximately the following yardage in any medium weight yarn:
- Newborn: 85 yd (78 m) in CA, 10 yd (9 m) in CB
- 0-3 Months: 100 yd (91.5 m) in CA, 10 yd (9 m) in CB
- 3-6 Months: 115 yd (105 m) in CA, 10 yd (9 m) in CB
- 6-12 Months: 135 yd (123.5 m) in CA, 10 yd (9 m) in CB
- Toddler: 145 yd (132.5 m) in CA, 10 yd (9 m) in CB
- Child Small: 165 yd (151 m) in CA, 10 yd (9 m) in CB
- Child Large: 190 yd (174 m) in CA, 10 yd (9 m) in CB
- Teen/Adult Small: 205 yd (187.5 m) in CA, 10 yd (9 m) in CB
- Adult Medium: 230 yd (210.5 m) in CA, 10 yd (9 m) in CB
- Adult Large: 250 yd (228.5 m) in CA, 10 yd (9 m) in CB
- US Size H-8/5 mm crochet hook, or size needed to obtain correct gauge
- US Size I-9/5.5 mm crochet hook, or size needed to obtain correct gauge
- Locking stitch marker
- Yarn needle
Finished Size
- Newborn: 12” (30.5 cm) hat circumference x 5” (13 cm) height
- 0-3 Months: 14” (35.5 cm) hat circumference x 5.25” (13.5 cm) height
- 3-6 Months: 15” (38 cm) hat circumference x 5.5” (14 cm) height
- 6-12 Months: 16” (40.5 cm) hat circumference x 6” (15 cm) height
- Toddler: 17” (43 cm) hat circumference x 6.25” (16 cm) height
- Child Small: 18” (45.5 cm) hat circumference x 6.75” (17 cm) height
- Child Large: 19” (48.5 cm) hat circumference x 7.25” (18.5 cm) height
- Teen/Adult Small: 20” (51 cm) hat circumference x 7.5” (19 cm) height
- Adult Medium: 21” (53.5 cm) hat circumference x 8” (20.5 cm) height
- Adult Large: 22” (56 cm) hat circumference x 8.25” (21 cm) height
Photographed sample is size Adult Medium shown on a mannequin with 22.5” (57 cm) head circumference.
Hook and Tools
- US Size H-8/5 mm crochet hook
- US Size I-9/5.5 mm crochet hook
- Locking stitch marker
- Yarn needle
Abbreviations
- BL – back loop only
- CA – Color A
- CB – Color B
- ch – chain
- dc – double crochet
- invdec – invisible decrease
- RS – right (front) side
- sc – single crochet
- sl st – slip stitch
- st(s) – stitch(es)
- WS – wrong side
- yo – yarn over
Pattern Notes
- Ch 1 at start and sl st at end of Rows and Rounds DO NOT count as stitches.
Gauge
- 10 scBL = 2.5” (6.5 cm) across with smaller hook. Exact gauge is not critical for Hat Band.
- 14 sts = 4” (10 cm) in pattern for Work Even with larger hook. For best results, always check your gauge.
Special Stitches
- Invisible Decrease (invdec): Insert hook in front loop only of each of next 2 sts, yo and draw up a loop, yo and draw through 2 loops.
Instructions
Beanie
Hat Band (All Sizes)
With CA and smaller hook, ch 7 (7, 7, 7, 7, 9, 9, 11, 11, 11).
Row 1: Turn, skip 1 ch, sc in next ch and each ch across. (6 (6, 6, 6, 6, 8, 8, 10, 10, 10) sts)
Row 2: Turn, ch 1, scBL in first st and each st across.
Repeat Row 2 until Hat Band measures approximately 12” (14”, 15”, 16”, 17”, 18”, 19”, 20”, 21”, 22”)/30.5 cm (35.5 cm, 38 cm, 40.5 cm, 43 cm, 45.5 cm, 48.5 cm, 51 cm, 53.5 cm, 56 cm) long. Do not fasten off. Fold Hat Band over lengthwise so that short edges are together, being careful not to twist. Join with slip stitch seam across short edge. Do not fasten off.
Work Even (All Sizes)
Set Up Round: (RS) Ch 1, evenly work 44 (48, 56, 56, 60, 64, 68, 72, 76, 80) sc along the long edge. (44 (48, 56, 56, 60, 64, 68, 72, 76, 80) sts)
Round 1: (RS) Change to larger hook, ch 1, starting in first st [dc in next 2 sts, sc in next 2 sts] around, join with sl st to first dc.
Round 2: Turn to WS, ch 1, [sc in next 2 sc, dc in next 2 dc] around, join with sl st to first sc.
Round 3: Turn to RS, ch 1, [dc in next 2 dc, sc in next 2 sc] around, join with sl st to first dc.
Repeat Rounds 2-3 until hat measures approximately 5” (5.25”, 5.5”, 6”, 6.25”, 6.75”, 7.25”, 7.5”, 8”, 8.25”)/13 cm (13.5 cm, 14 cm, 15 cm, 16 cm, 17 cm, 18.5 cm, 19 cm, 20.5 cm, 21 cm) height, ending after either Round. Fasten off CA with long yarn tail (approximately 18”/45.5 cm long). Thread yarn needle with long yarn tail and cinch final round closed by weaving yarn needle through each stitch on bottom edge. Slowly tighten yarn tail to pull top closed until approximately 1” (2.5 cm) diameter is still open. DO NOT seam the top closed.
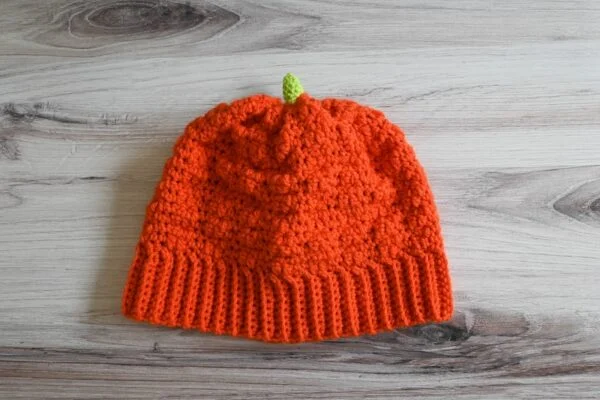
Stem (All Sizes)
Round 1: Join CB to any st on top opening of hat with RS facing, ch 1, evenly work 12 sc along the opening at top of hat, place stitch marker in last st to mark position. Move up stitch marker each round. (12 sts)
Round 2: Sc in each st around.
Round 3: [Invdec, sc in next st] around. (8 sts)
Rounds 4-6: Repeat Round 2, 3 times.
Round 7: Invdec around. (4 sts)
Fasten off CB with long yarn tail (approximately 12”/30.5 cm long).
Finishing
Thread yarn needle with CB, seam top of Stem with whipstitch seam. With yarn needle, weave in ends on inside of hat.
Emma’s Tips
To keep your edges straight when working the hat band, make sure you’re always working into the correct loop for the single crochet back loop (scBL) stitches. Using a stitch marker in the first stitch of each round for the stem can really help you keep track of your stitch count, especially with those decreases! Don’t be afraid to experiment with different yarn colors beyond traditional orange for the pumpkin body – a cream or even a variegated yarn could create a unique look. Blocking isn’t strictly necessary for this beanie, but a gentle steam block can help even out your stitches and give the hat a more polished finish.